- Key features of Project Management extension
- Task Dependencies
- Understanding Subtasks
- Defining Milestones
- Project Boards Overview
- Groups Explained
- Types of Project Views and how to use them
- How to use projects as templates with the Project Cloning feature
- How to control and manage access to Projects
- How to use Reports with Projects
- How to use BPM processes with Projects
What can make or break any project regardless of how big or small it is? If you’ve thought of poor project management, you guessed it right. Be it the launch of your client’s big app or the coordination of the winter marketing campaign, solid project management functionality is the foundation of your operation. It’s what will keep your team productive, tasks organized, and deadlines met.
Understanding these struggles, we’ve built our new Project Management extension, a full-featured tool that brings together customer relationship management and project management in one place. But how does it work? Let’s explore its key features and see how they can improve your project management experience in detail.
Key features of Project Management extension
Projects
If you have a goal or initiative that involves multiple steps or tasks, a Project can help you keep everything organized. The feature allows you to create separate Project records for different initiatives, which simplifies finding all relevant information, assigning tasks, setting deadlines, and monitoring progress.
For example, if you’re leading a team on a big project for redesigning a client’s website, you can create a Project called “New Website Design”. Then, add Date Start and Date End, specify Team members, assign them Roles based on their access permissions, and create all the Tasks associated with that project. You can also use Stream to share updates and documents, which makes collaboration more efficient because communication is not scattered in various apps and chats.
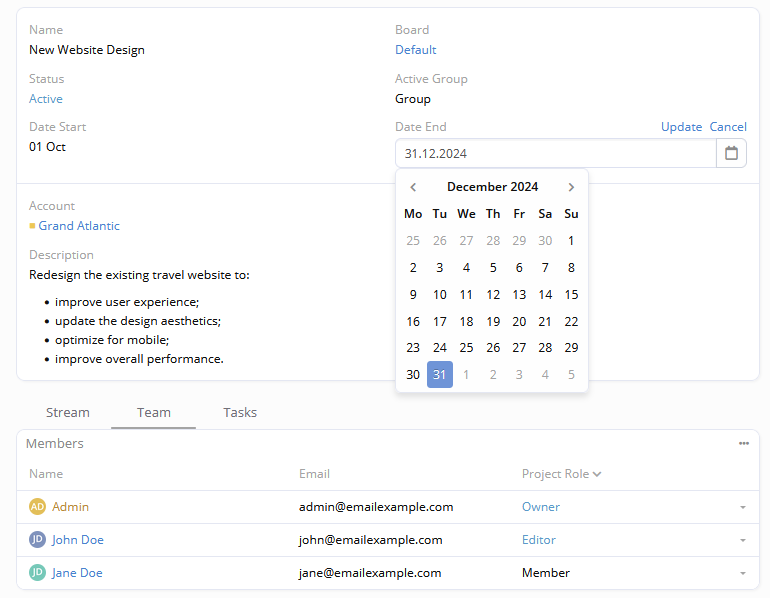
The Projects feature removes the chaos that often comes with managing teams and multiple tasks. It centralizes all project-related information, improves communication, and keeps everything easy to find.
Tasks
Projects are usually associated with a considerable amount of work and, for that reason, they’re divided into smaller steps. These smaller parts of work are called Tasks.
Let’s return to our project on the website redesign to illustrate how this feature works. In this project, you’re likely to encounter Tasks like “Design Homepage”, “Fix Login Bug”, or “Test Payment Checkout”. They can be created on the Plan View, Board View, or Gantt View by clicking on the “+” or “+ Create Task” buttons.

All these Tasks will have the Owner (a person who created them and oversees them) and Assigned User (a person who is responsible for their completion). They will probably be organized within different Groups as they belong to different types of work on the project like “Design” and “Testing” respectively. Also, they will have different Priorities (“Low”, “Normal”, “High”, or “Urgent”) and will be placed into some Columns (“To Do”, “In Progress”, “Review”, or “Done”) on your Project Board based on their status.
Along with that, each Task also has a Timeline, Points, and Hours. The Timeline consists of a Date Start and Date End fields and is used to monitor the duration and deadlines of your task. Points represent the complexity of the work and Hours are used to estimate the time required for completion. In case you do not need some fields, such as Points or Hours, or on the contrary need a custom field to store specific data, you can add fields or remove them in Entity Manager.
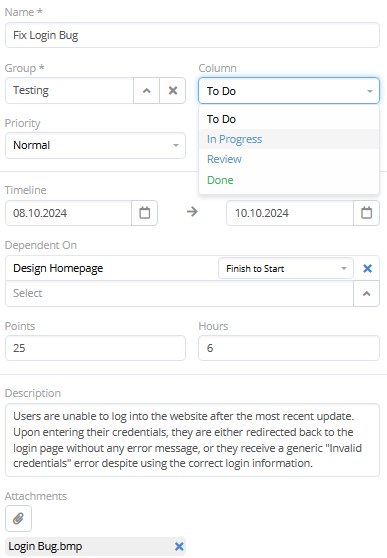
Basically, the Tasks functionality brings order into your project management. You do not need to write to-do lists and define responsibilities in emails to your team members.
Assigning tasks to specific people and tracking their status allows you to be certain that everyone knows what they need to complete and nothing gets overlooked. The automatic reminders about deadlines and status updates, when tasks are moved across columns in Project Boards, save time and keep your entire project transparent and easy to follow.
Task Dependencies
Task Dependencies show how Tasks are related to each other. For example, in our project, “Developing UI/UX Prototype” must be approved and completed before starting the home page design. Meanwhile, “Mapping User Flow” also needs to be initiated to finish creating the initial homepage design concept. These dependencies create a logical order for all Tasks related to homepage design and the work is completed according to your plan.
In EspoCRM, there are four types of Task Dependencies:
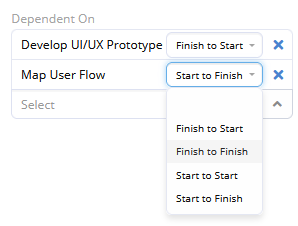
- Finish to Finish – one task must be finished before another task can be finished.
- Start to Start – one task must be started before another can start.
- Start to Finish – one task must be started before another can be completed.
One Task can have several dependencies and you can specify them either during the creation or editing of the Task, Subtask, or Milestone records in the Dependent On fields.
This functionality helps to structure complex projects where the completion of one task impacts another. Your team can see which tasks rely on others, and it prevents them from starting tasks too early and allows work to progress in the proper sequence.
Subtasks
In some projects, there may be complex tasks that require multiple steps and can involve several people to get them completed. For convenience, such tasks can be subdivided into smaller Subtasks. They function the same as Tasks, have the same fields, and can be created or viewed in the Detail View of a parent task. The sequence of Subtasks can be rearranged by dragging and dropping them.

Let’s get back again to our example with website redesign. At the initial stage of the project, your team is likely to prepare a “Website Design Prototype” for a client. This Task is huge and you’ll probably need to break it down into smaller Subtasks. You may create Subtasks like “Color Scheme Selection”, “Design Homepage Prototype”, or “Preparing Mobile Version Layout”. If you have a large team of designers, each of these Subtasks can be assigned to a different team member.

Subtasks improve work planning and organization. They help everyone concentrate on their specific part of the work and see how it fits into the bigger picture. This feature also simplifies tracking progress on each part of the project.
Milestones
Milestones are significant events in the project’s timeline that indicate the completion of a certain goal or a large project phase. In our example project, completing the design of the “About us” page can be a Milestone. Each of the Milestones marks a major step forward and helps you determine whether the project is on schedule.

In EspoCRM, Milestones have somewhat similar fields as Tasks (Group, Column, Timeline, and Dependent On). They can be added on the Plan View, Board View, or Gantt View by clicking on the drop-down menu ![]() next to the “+ Create Task” buttons and selecting the “Create Milestone” option.
next to the “+ Create Task” buttons and selecting the “Create Milestone” option.
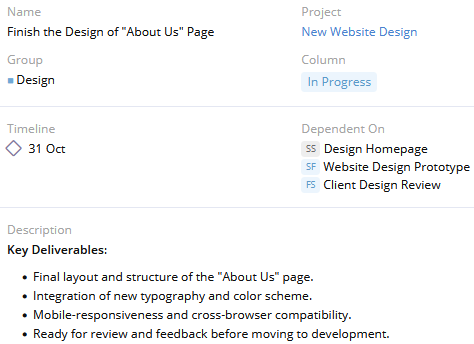
Milestones are a useful functionality that can keep your team motivated, since completing them provides a sense of achievement. Also, if a Milestone is delayed, it can signal that there’s a problem that needs to be addressed, otherwise the project will not follow your schedule.
Project Boards
So, you’ve created a first Project and started working on it. As your team works on Tasks, it becomes difficult to track them across various stages and you have to sift through Stream posts or emails to see what’s done and what’s in review. Obviously, you need a clear visual representation of where each task is in the project lifecycle and Project Boards provide that. This feature is, in fact, a Kanban board made up of Columns, like “To Do”, “In Progress”, “Review”, and “Done”, that correspond with different stages of the project tasks.
When the Task progresses, your team members need to simply drag and drop it into the appropriate Column. Each Project has its own Board, the Columns are mapped around the Task Statuses and can be customized to visualize your project progress. When you create a new Project, you can either use a Default board or set up your own to fit your needs.
To create a custom Board with your own list of Columns, you need to go to the List View of Projects > click on the drop-down menu ![]() next to the “+ Create Project” button > Boards. Then, just create a new Board, open it, and define new Columns based on the Task Statuses. It allows you to have several Boards that correspond with your processes and can be used in different projects for better task organization and visibility.
next to the “+ Create Project” button > Boards. Then, just create a new Board, open it, and define new Columns based on the Task Statuses. It allows you to have several Boards that correspond with your processes and can be used in different projects for better task organization and visibility.
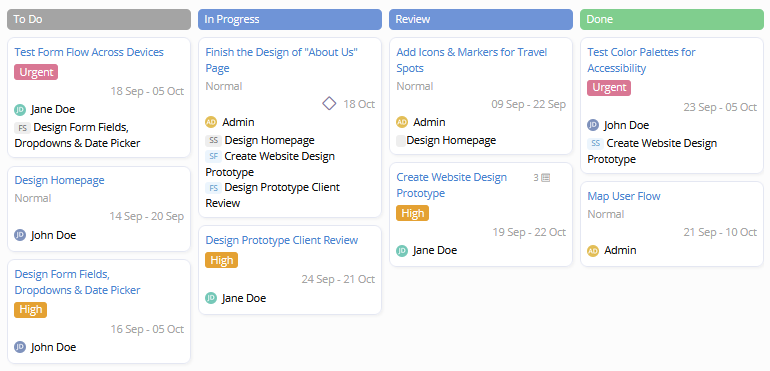
This visual representation provided by Boards brings clarity into your projects and helps your team quickly understand what needs attention and where each task is in the project. And for a project manager, it’s a great way to stay organized and monitor that everything gets done on time.
Groups
If you’re working with small projects, simply adding lists of Milestones, Tasks, and Subtasks may be enough. But for more complicated projects, you may need to categorize these records into Groups.
Projects can have their own unique set of Groups to classify Tasks based on different criteria such as phases, teams, types of work, or any other relevant characteristic. Perhaps, the most common use cases for Groups is to divide a project into phases (e.g. “Planning”, “Development”, “Testing”, “Deployment”) or sprints.
Groups can be added, removed, or edited by users with the Project Owner’s or Editor’s Roles on the Plan View. Creating and reordering Groups can be accessed by clicking on the drop-down menu ![]() next to the “+ Create Task” button and selecting corresponding actions. To edit or remove a Group, you need to click on the drop-down menu at the top corner of the desired Group and also select the corresponding action. For easy identification, it’s even possible to define a specific color for each Group.
next to the “+ Create Task” button and selecting corresponding actions. To edit or remove a Group, you need to click on the drop-down menu at the top corner of the desired Group and also select the corresponding action. For easy identification, it’s even possible to define a specific color for each Group.
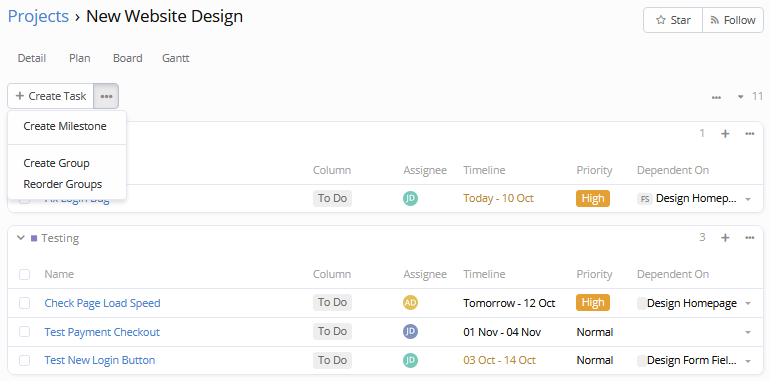
Speaking of our website redesign project, we can create Groups like “Design”, “Development”, “Testing” and “Content Creation”. Then, we just add Tasks related to each Group of the project. For example, Tasks like “Test New Login Button” and “Check Page Load Speed” will be associated with the “Testing Group”.
Configuring Groups defines a clear structure in your project and keeps Tasks related to the same area together. It also helps to visualize your work and better prioritize Tasks, which ultimately makes the team more productive and improves collaboration.
Types of Project Views and how to use them
Employees on your project team will need to view project-related information a little differently. Someone will only need a list of Tasks to quickly see deadlines and your project manager may require a visual board to track progress or a Gantt chart to visualize Task and Milestone Dependencies. That’s why there are three different views designed to present tasks and project activities from different angles.
Plan View
Plan View is a simple layout where you can organize your Tasks into Groups.
Here, you will quickly see the Timeline, Assignee, Priority, Dependent On, Points, Hours, and Column of all your project Tasks and Milestones. Of course, you can select which of the mentioned fields to display by clicking the drop-down menu at the top right corner.
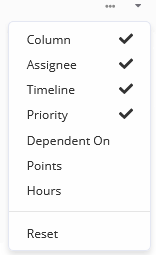
The view also allows you to instantly access, create, edit, remove and complete tasks using the drop-down menu next to each Task. You can even drag and drop Tasks within or between Groups to keep them organized just the way you like.
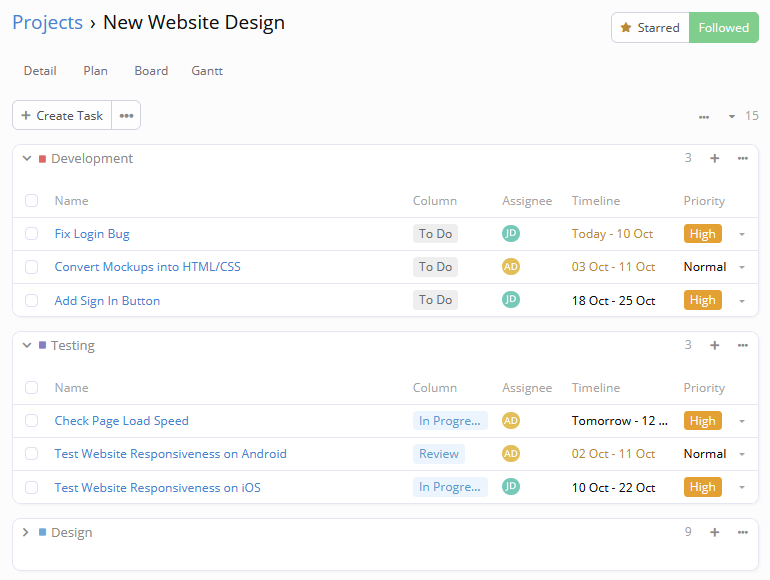
This view is very useful if you’re managing a project with multiple phases, such as development, testing, and deployment, or want to apply Agile methodology and use sprints in your project. It keeps all the important details about tasks in one place, so your team can quickly see what needs to be done and the role of each task within the project. Also, it makes it easier for project managers to plan work schedules and allocate resources.
Board View
Board View is a layout that shows your tasks as cards on a Kanban board. It organizes your tasks based on the Column field and helps to see what’s planned to be done, what’s in progress, what’s in review, and what’s already done. You can both drag tasks from one Column to another and reorder them within a Column. The cards display the same fields as on the Plan View, these fields can be added or removed by clicking the drop-down menu at the top right corner. In addition, Board View is directly connected to Groups and shows tasks from one specific group at a time. You can easily switch to the desired Group by clicking the drop-down menu with the Group Name.
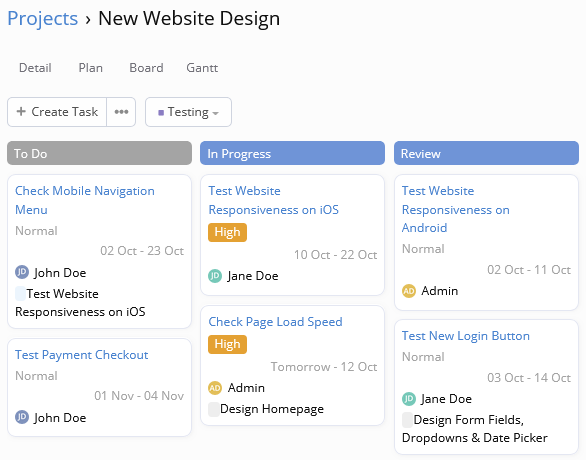
While Plan View allows you to organize tasks based on different project areas, Board View provides the ability to monitor the progress of the tasks belonging to the same area. For example, you can open the Board View of “Development Group” and see all relevant tasks and their statuses. It helps different parts of your project team focus on their aspects of the project and keeps their work organized.
Gantt View
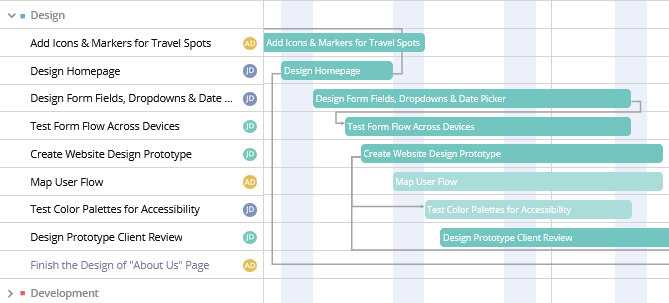
Gantt View is a great functionality that visualizes your project’s Timeline. It displays the Date Start and Date End of Tasks, their durations, Milestones, and Task Dependencies. Since we’re running a website redesign project, you will be able to see all the Tasks from “Design” to “Testing”, key Milestones, and when they need to start and finish. If you need to adjust Timelines, just drag and drop the selected Tasks to new positions or resize them to change their duration.
This view helps to understand how Tasks relate to each other, quickly identify task overlaps or milestone delays, so you can adapt your schedules to keep projects running smoothly and meeting deadlines on time.
How to use projects as templates with the Project Cloning feature
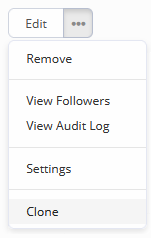
If your company often deals with projects that have a similar structure and set of processes, you may find Project Cloning very handy. This functionality allows you to duplicate a project, including its Tasks and Groups. Optionally, you can also clone Members, Task Owners, Task Assignees, and Attachments. To create a clone, you need to open the Detail View of the desired project, choose the Clone action from the drop-down menu next to the Edit button, set its Name and a new Start Date. The system will automatically adjust Timelines based on the new Start Date.
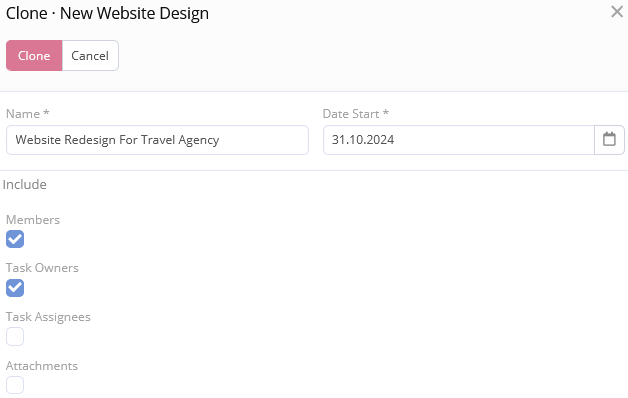
Basically, this functionality allows you to use some projects as a template for other similar projects. It saves a lot of time that would be otherwise spent on manual recreation of Tasks, Groups, and Assignments for recurring projects. You can quickly replicate complex project setups with a few clicks and be sure that there are no mistakes associated with manual data duplication.
How to control and manage access to Projects
Some projects deal with sensitive information that only certain team members who work on them should have access to. Besides that, when everyone in your company can make changes to critical tasks, it may cause a lot of costly mistakes or even security issues. In EspoCRM, you can control access to projects on the system level using Roles and on the project level by configuring Project-Level Roles.
System-Level Roles
At the system level, Roles define general access to Projects and Project Boards. For example, to be able to access Projects functionality in the system, users need to have the Project scope enabled and specified relevant permissions for “create”, “read”, “edit”, and “delete” actions at least.

Project-Level Roles
For more granular control, you can configure Project-Level Roles. These roles determine who can do what within a specific project.
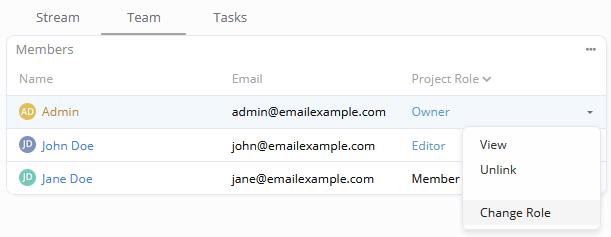
Here’s a short overview of the default Project-Level Roles:
- Owner has full access, including editing the Project, managing Members, and creating or editing Tasks.
- Editor can also edit the Project and Tasks but doesn’t have management capabilities over other Members.
- Member can view their Assigned Tasks and move them between Columns, but can only edit the Tasks they own.
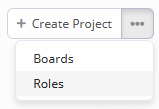
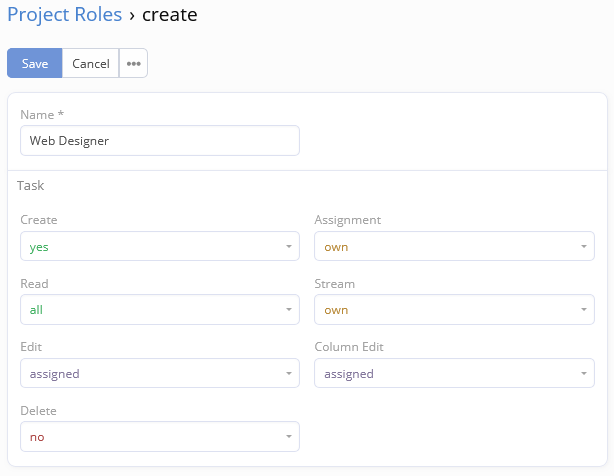
As an admin user, you can also create custom Project Roles tailored to your team’s needs by going to the List View of Projects > drop-down menu ![]() next to the “+Create Project” button > Roles.
next to the “+Create Project” button > Roles.
There you can specify the Task-level access to “create”, “assign”, “read”, “edit”, “delete”, “edit Column“, and “view Stream” actions. You can assign Project-Level Roles at the Detail View of the desired project in the Team tab on the Bottom panel when you add new members to your project.
How to use Reports with Projects
How to use BPM processes with Projects
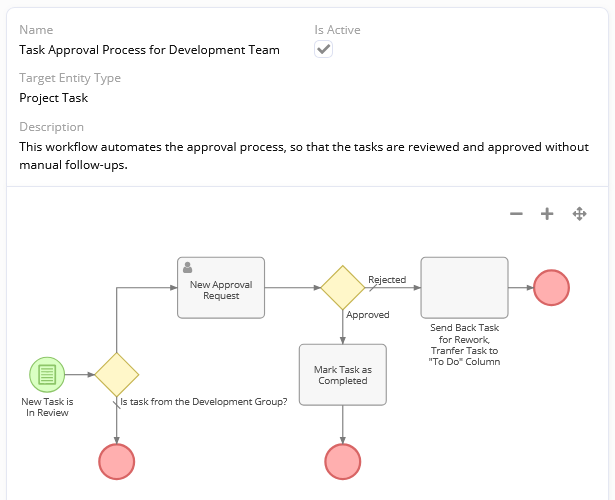
Project management often involves repetitive processes that can be automated using a BPM tool. In the project described earlier, for example, there were certain tasks that required approval from the development team lead before moving forward. But manually tracking when each task has changed its Column to “In Review” is not practical. In these cases, you can set up a BPM flowchart to handle approvals automatically. Here’s how it could work: when a Task is “In Review”, the system checks whether this Task belongs to the “Development Group” and triggers an automated approval request to the team lead. Then, the team lead can review the Task, and if it’s approved, the Task is marked as completed. If it’s rejected, it’s sent back for rework. It eliminates the need for writing manual follow-ups and reduces the risk of forgotten tasks.
Using BPM can also be handy for onboarding new team members to your projects or getting notifications about Tasks that are uncompleted but nearing their deadlines. The functionality ensures that critical processes are handled consistently and in a timely manner. It frees up your team’s time to focus on their work, promotes efficiency, and prevents delays caused by overlooked steps.
